|
ARTICLES & HOW-TOS |
Model Ship Kits, What to Expect
Dirk De Bakker & Greg Brooker
You have taken your time, studied the facts and figures and finally gotten over the expensive ordeal of your first kit purchase.
You may have paid a lot of money for it and as such you are entitled to expect a quality item. Most good kit manufacturers will back up their product 100% as they are keen for you to go onto another project later on.
As these kits are mass produced they are subject to errors and break downs on the assembly line. Timber quality and metal parts are subject to poor quality control, transit damage or are possibly missing from the pack.
There are a few steps you should take to ensure your kit is up to scratch and as complete as it should be.
Initial Inspection
Open the box and visually inspect the parts packets. These are usually wrapped in plastic bags or in separate trays. If the bags are torn or open put them aside for the moment. Remove the wood from the box but don’t separate the bundles as these should be in groups for ease of recognition. Lay the rest of the contents out and read through the inclusions list. This list should completely itemize all parts of the kit.

Individually check that the parts are there without removing them from the various bags or bundles. If you have to open a bag carefully place the contents after checking into small containers that will hold all the parts, this is essential as some of these parts are hard to determine later and mistakes or loses are costly as well as very frustrating. Extra storage trays for small items are readily available at most hardware stores. Check each part carefully for damage and general quality. On metal parts some flashing is acceptable and can be cleaned off with a metal file before use.
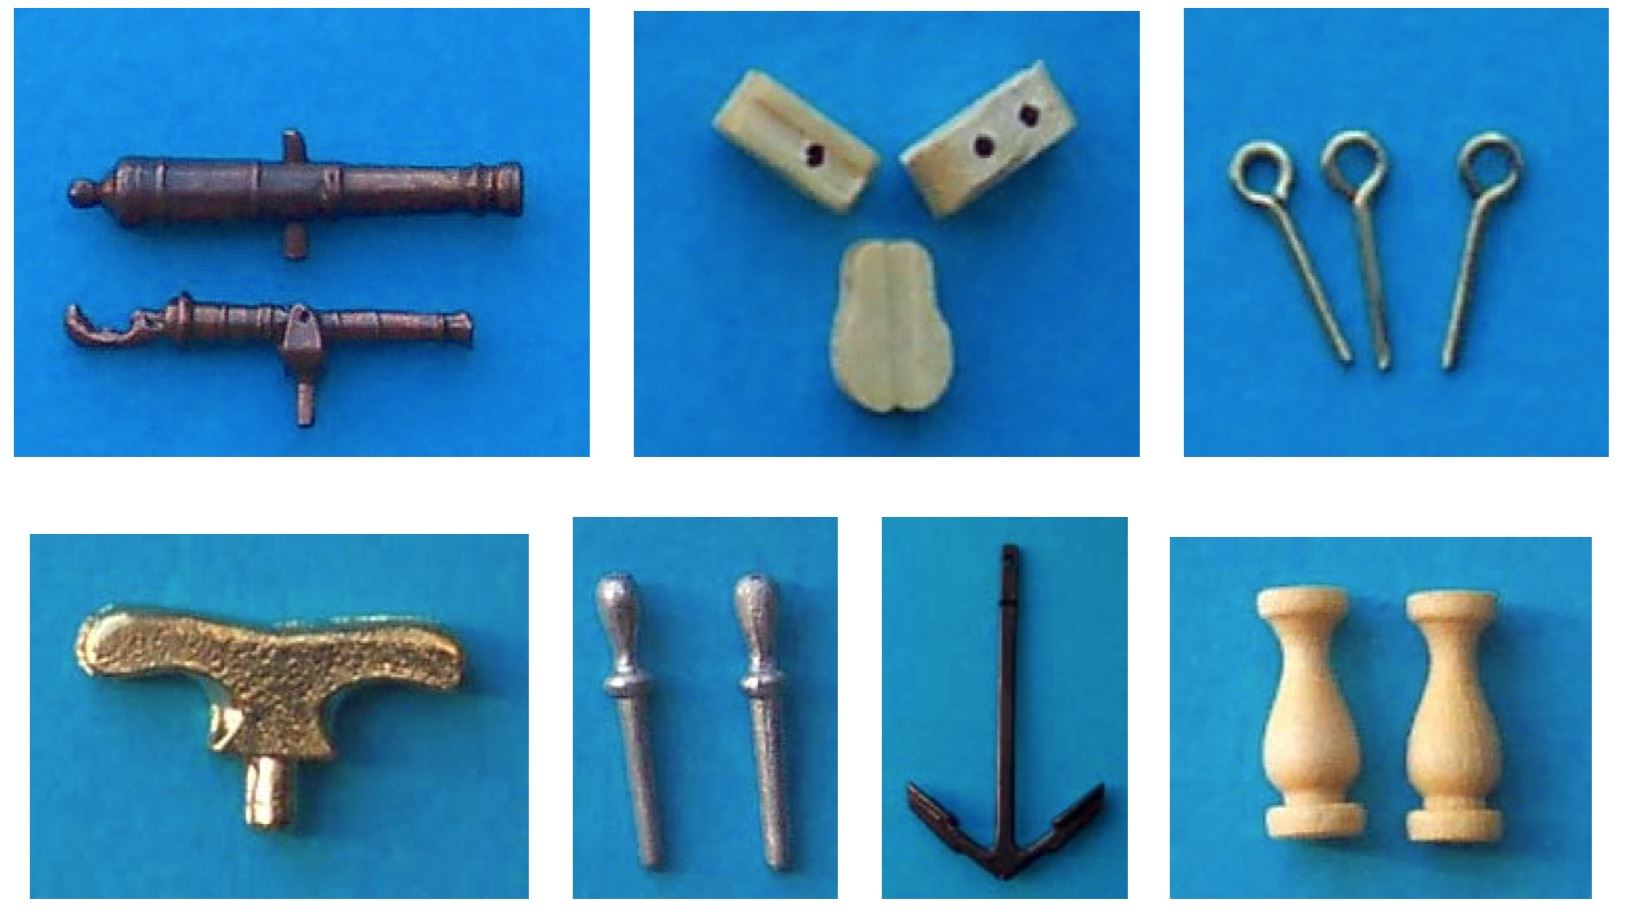
Rigging Materials
Check individual rope blocks, dead eyes, cannons etc. This is important as it is often difficult to match up the part at a later date because sometimes kits are discontinued. Therefore the parts will no longer be available or a different supplier is now used and the style and colors may differ considerably. Look for cracks or splits in turned timber parts such as railing stanchions, barrels, windlass and capstan parts. Blocks and deadeyes should be given the same close inspection. While having to scratch build missing parts later is easy for an experienced modeler it can be a daunting prospect for the newcomer, so look closely and check ALL parts carefully, don’t assume.
Rigging string should also be carefully checked to see that the correct amount is included. Again as in the above, rigging string is very difficult to match up if you run short. Manufacturers use various suppliers and quality and match up is at times impossible as well as time consuming. There is nothing worse than to be progressing well with the rigging only to find that you are a few meters short of the most common rigging rope.

Plywood Bulkheads and False Keel
Modern kits are generally supplied with accurately laser cut ply sheets, bulkheads and false keels come in this form. Unfortunately this is an area where a lot of problems ensue. Ply due to its very nature and its ability to absorb moisture is a real problem. It should be stacked flat on the bottom of the kit or in a suitable manner out of harms way until required. Check to see if its is warped, split or twisted. There are ways to overcome this but it is much better to start out with something that is correct in the first place rather than spend hours trying to fix it and then finally fail to do so. These ply items and other pre-cut sheets should immediately be stored correctly on removal from the kit by placing them on a hard flat surface and placing a weight to the top. Avoid exposure to sunlight or moisture as these are the causes of warping problems that can be difficult to fix. Prevention is better than cure.

Masts and Spars
These are another problem area; depending on the timber used dowels can warp in storage or be of an unsuitable grain structure. To check for warping roll the dowel across a flat surface. Any bending is readily apparent.
Check all dowels and store them away as with the ply keel and bulkheads. It is going to be a while until they are required but, first check for unsuitable grain structure. Cross grain makes for a weaken mast (a) or spar (b) and when rigging tension is applied it is very upsetting to see the mast or spar break especially when it has already been fitted to the hull. So take the time to gently flex the dowels to make sure they will stand the building process. Consistent colouring is also an important factor. Not so necessary in a painted mast but essential in a varnished situation.

(a) cross grains make for a weakened mast

(b) cross grains make for a weakened spar
Planking Timbers
Keep the individual bundles separate, don’t mix the timbers with one another. Different timbers are used for different applications and are limited in quantities. First planking timbers (a) are usually 1.5mm thick and consist of a lesser quality wood than second planking timbers (b) often 0.6mm thick. Check that sufficient quantities are supplied; this is sometimes difficult to check carefully so some measuring of the hull shape will help. Choose the largest bulkhead, usually amidships, measure from keel to the deck area, double it and add 10% to the figure. Measure the width of the supplied planking material and calculate the number of planks required. Always make sure there is more than required and if there isn’t enough material then make enquiries with your kit supplier. Finding you are short and that you can’t match the color or size is extremely frustrating. Color is the most difficult of all things to match as quite often some of these timbers come from different ends of the earth and are almost impossible to find again. Obviously these steps are far more critical with the second planking timbers as the first planking material can be matched with almost anything of the same thickness and width.

(a) first planking timbers

(b) second planking timbers
Check the individual planks for width. Some variations do occur so match these up together and mark or set them aside so they do not mix with the other stock.
Guillotined timber veneer has a ragged edge, sawn cut timbers have good clean edges; do not get them mixed up. Make sure the raggedy edges are not too rough or have chunks missing from them. Again check for uniform widths and quantities.
Test all timbers for unsuitable grain structures. Again cross graining, knots, splits and fractures are cause for rejection. Test durability by flexing slightly but do not overdo this as timbers are not meant to bend unduly without some sort of treatment like soaking, steaming etc. Some walnut and beech timber is prone to easy fracturing so check carefully and handle gently. As with all the timbers, store flat in a dry place away from direct sunlight.
Sails
At times the sails which are supplied with kits are of poor quality and not suitable for a reasonably accurate model. Sometimes the fabric is an open weave net like material or is striped to imitate the sail panels. These types of materials should be replaced with a more life like material that accurately represents the true canvas sails of a real ship. Calico is life like and easily obtainable from fabric and craft shops. There are a variety of colors available and the usual color would be off white/ cream or with a slight brownish tinge to it. Of course altering the color can be carried out by further staining with a variety of additives and home grown formulas all of which add that realistic touch to the model. Go with a medium grade calico. Too hard and its gives a really stiff cardboard looking sail and too fine and the sail hangs limp like a plastic sheet. There are several methods of making sails and a “how to do” article appears elsewhere in this series of tutorials. It is just a matter of how much effort and time you want to put into this model. Sails however are the first thing that catches a observer’s eye. An alternative is to make the model with furled sails or without sails altogether. This is a hotly debated subject and it really boils down to your personal choice and ability.

Hardware
Kits generally come with nails as part of the deal. These should be only used for temporary assembly to hold wet planks in place until the glue has dried. They should then be removed and discarded. It is disappointing to later have to drill a hole for some attachment only to find a nail present in the first planking exactly where you want an accurate hole.

Instruction Manuals
Hopefully it is in the language of your choice. If not then maybe one of the online translator programs can help. It should contain step by step instructions for the building of your particular ship. This should also include a series of comprehensive photos or drawings that clearly set out the method of construction. The unfortunate truth is that there are times when the instructions are practically useless especially if the builder has bought a model above their skill level or quite simply the instructions are not precise, are poorly written or poorly translated. Be aware that when manufacturers grade the difficulty levels of their models they often write the instructions accordingly i.e. the instructions for an advanced model will assume that the builder already has a certain level of skills. This is not always reversed for beginner’s kits and these instructions can be lacking in content and very confusing, not the case with the pictured Model Shipways Sultana & Harriet Lane instruction booklets.

Plans
These are the detailed drawings of the particular ship you are working on. It should include, working drawings, line drawings, sheer and deck plan as well as rigging plans (a) and for more advanced models be complimented by a pictorial instruction booklet (b). The number of plan sheets is governed by the difficulty level of the kit and the accuracy of the ship being modeled.
Not all of the listed plans are supplied with every kit, it often depends on the complexity of the kit, this not a cause for great concern but if they are included it will help in the long run.

(a) rigging plans included with a kit

(b) advanced pictures of assembly found in the instructions
Problems
Most kit manufacturers are very obliging and will stand behind their product, it is in their best interests to do so. Often a problem is resolved by a simple email or if possible a phone call to the supplier, hobby shop where the purchase took place and if that fails to the kit manufacturer. This usually results in the matter being resolved and the missing/damaged parts being dispatched immediately. Negotiation is always better than conflict in these matters. The manufacturers and kit retailers want to keep you on board as a customer and most usually go out of their way to ensure you have a good relationship with them. Many are happy to answer emails if you are uncertain of a step or procedure, just remember it takes time to answer emails, time zones and back logs are a problem if the company is busy. So courtesy goes a long way.
Research
This is up to you. There is a lot of help on this forum and various web sites, museums, model clubs as well as the real thing floating around in a harbor somewhere. Various other aspects of kit building are discussed elsewhere on the Model Shipwrights Database.
We fully realize that the full checking of a kit will take some time and that you are keen to get on with the building and forget about doing a complete inventory. However please remember that many kits will take months if not years to complete so to spend a few hours checking the contents is a few hours well spent and occasionally it will save a great deal of heartache further down the track.
Prepared and written by: Dirk De Bakker (Kelvin12) & Greg Brooker (Southlander) for the exclusive use of the “Model Ship World” website.
|
© 2023 The Nautical Research Guild, Inc. Nautical Research Guild ® and the NRG logo are Registered Trademarks, and belong to the Nautical Research Guild (United States Patent and Trademark Office: No. 6,999,236 & No. 6,999,237, registered March 14, 2023)
|
![]()
© 2020 The Nautical Research Guild, Inc.
![]()